Project 3: Cryptography
- This project is due at 11:59pm on Friday, Oct 30, 2020.
Description and Deliverables
In this project, you will learn 3 different ways to generate a public and private key, how to manage keys and identities of other people, and how to use your key to sign your assignments. You will also learn why re-using a one-time pad key results in a complete loss of privacy.
To receive full credit for this project, you will turn in the following three files:
-
A file named key.pub which includes your public key in ASCII format. Your public key must meet the following four requirements:
- Use RSA encryption and be 4096 bits long
- Include your name and Northeastern email address
- Be signed by at least two of your classmates
- Include your picture.
-
A file named message.txt.asc that is encrypted using the class public key and signed by your private key. The unencrypted message.txt file should be in plain ASCII format (no Word or PDF docs), and contain (1) your first and last name, (2) your github user name, and (3) the string “CY2550”.
For example, a valid message.txt might look like this:
abhi shelat abhvious CY2550 -
A file named decoded.txt that contains 3 decrypted messages from the one time pad example below.
-
a Keybase profile that has the same PGP key and follows at least 2 people in the class.
-
an ssh key that has been added to Github.
Using the One-time pad twice
In class we discussed how using your one-time pad key twice breaks all of the security properties. In this exercise, we will explore why this is true. You can read about Project Venona to learn how such an attack was carried out over several years against Soviet diplomatic telegrams.
Recall that the encryption of the first message would be $$ c_1 = m_1 + k $$ and the encryption of the second message would be $$ c_2 = m_2 + k $$
Your attack can make use of two observations: First, if two ciphertexts have the same value at a position, then their plaintexts also have the same character.
Second, your attack can first xor any two ciphertexts that you have:
$$ c_1 + c_2 = (m_1 + k) + (m_2 + k) = m_1 + m_2 $$
The last equality in that question follows because $k+k = 0 \bmod 2$, when you xor the same string with itself (over the binary alphabet), then you get 0.
Now the attack can proceed by guessing a word, $w$, and the position that it appears in the first message $m_1$. Make your guess, and then xor the guess in the corresponding position of $m_1 + m_2$. The result would correspond to a word in $m_2$ at the same position; validate your guess based on how likely the resulting word is English.
Suppose that Alice uses the same key to encrypt the following three messages (written in hexadecimal):
CIPHERTEXT 1: 0D 1A 8F 0B 38 C6 2A 32 D8 0F A0 9E 0F DC 7B FA 05 2E 46 26 87 1B 50 EB 5D CD CB C2 DD E9 B0 52 64 A3 79 56 93 EE 2B 53 91 93 CB 7F CF 6F 2E
CIPHERTEXT 2: 1E 1D 9D 6E 28 D1 31 38 D8 10 A7 ED 19 BD 67 8C 02 5C 4E 26 84 68 31 FA 4F A0 A9 DD AF E7 DD 31 78 B9 71 4B 81 E2 5E 4F F7 E5 D1 74 D5 6E 4B
CIPHERTEXT 3: 10 15 F9 1C 2F D7 36 2E BB 0A AD 8C 0F B5 71 E2 60 4C 46 2B 88 1B 45 E0 3C C8 A4 D3 DB EE DD 31 76 A7 68 48 80 8B 4A 52 93 93 DD 79 D6 74 39
Recover all three plaintext messages and save them into the file decoded.txt. Be sure to maintain the exact format of the message, including all spaces and capitalization. All 3 messages are the same length, and you may need to add extra spaces at the end in your decoded file to make this true.
Hints
The messages are all in English upper-case with spaces, but the symbols are encoded using the ASCII mapping. For example, the character ‘A’ is encoded in ASCII as hex 41. If I guess that the first symbol in message 1 is an ‘A’, then the first key byte would be ‘41 XOR 0D = 0100 0001 XOR 0000 1110 = 0100 1111 = 7E’. This means that the first character in the second message would be 1E XOR 7E = 60 which in ASCII corresponds to the letter ‘`’ which is invalid. Continue in this way with guessing and checking to recover all the messages.
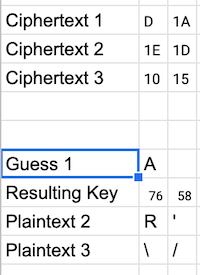
You may consider copying this simple spreadsheet template to help with a cribbing attack. This spreadsheet is incomplete, but it shows you how to use the dec2hex, bitxor, code and char functions to ease your manual effort. To use it, if you log in to your Northeastern google account, you can “File–>Make a copy” to get your own writeable version of this file. You can use “copy/paste” on these formulas, and Google sheets will automatically update indicies for you etc. You will have to modify the formulas for the Guess2, and Guess3 sections.
In particular, notice that the Guess 1 row allows me to make a guess on the first character. Based on the one time pad, the formula =bitxor(code(B9),HEX2DEC(B4)) then computes the resulting key byte for that position, and the formula =CHAR(BITXOR(hex2dec(B5),B10)) determines what the Plaintext2 would have to be if the first character was correct. A similar formula determines what the Plaintext3 should be.
Even though in lecture we showed an example of someone who wrote an entire book that didn’t contain the character “e”, the sender of these messages isn’t so clever. Because we know the language is English, it is a good bet that the three plaintexts include common english words like “a, an, or, the, if, and, of, on, …” as well as several vowels like ’e’.
You can start from the list of most common words to make guesses. Moreover, these words must have spaces around them too, so that gives you a crib of 3–5 characters. As an example, suppose I think that the first plaintext begins with the word “A”, in others words, the first two characters of Plaintext 1 must be “A
I can quickly try short words with spaces around them, e.g. " A “, in all of the other positions of plaintext 1. Similarly, I can also start from Plaintext 2 or Plaintext 3 using similar formulas. Now once I get a full word from one of these lines, using “Wheel of Fortune” like skills and Google for phrases, I will be able to guess all 3 of the lines.
SSH key for Github
The ssh program is a “secure shell” that allows you to remotely access another machine over an encrypted channel. ssh uses public key cryptography in order to both authenticate the remote user as well as generating a fresh encryption key to encrypt the communication channel between the remote user and the machine (i.e., so that the commands you type and the responses are encrypted). Ssh can also be used to authenticate and submit a commit to Github.
In this part of the project, you will create an ssh key and submit it to Github so that your future commits can be authenticated by your key instead of your username/password and your 2fa token.
You can do this on your macbook, your windows machine, or your linux VM. In any case (especially if you use your VM), be sure to backup your key somewhere so that you can continue to have access to your key. In particular, later assignments will require you to ssh into machines using your key.
The first step is to generate a new ssh key locally. Use the ssh-keygen program to do this:
$ ssh-keygen
Generating public/private rsa key pair.
Enter file in which to save the key (/Users/abhi/.ssh/id_rsa):
Enter passphrase (empty for no passphrase):
Enter same passphrase again:
Your identification has been saved in /Users/abhi/.ssh/id_rsa.
Your public key has been saved in /Users/abhi/.ssh/id_rsa.pub.
The key fingerprint is:
SHA256:BUDkayXlQGAMiw4RXPaJuiCPEqjQAbfeu7GEZo2W/sM abhi@abhi18
The key's randomart image is:
+---[RSA 3072]----+
|=.+=o=*.o        |
| *.++..+ .       |
|o +. oo o .      |
|+o.o   + .       |
|*oo . o S        |
|=+.= o           |
|+.O.=            |
|.= .E+           |
|  ..+.           |
+----[SHA256]-----+
You will be creating an RSA key to authenticate yourself with the above. It will ask you where to save the key (it is fine to use the default value here and press ‘Enter’), and whether you want to set a passphrase to encrypt your secret key.
Your next step is to install your key into your Github account. To do this, log in to your github, then click on your login picture on the top-right corner, and click on “Settings.” Then select the “SSH and GPG keys” menu on the left. Click the green “New SSH key” button on the top, and then you will be prompted to enter a title and key. Please use the words cy2550 key as the title so that we can find it. In the key window, it is important that you copy your public key into this. In my case, the public key was stored at /Users/abhi/.ssh/id_rsa.pub and looks like this:
ssh-rsa AAAAB3NzaC1yc2EAAAADAQABAAABgQCpq9NN843qa3nI5PR6zqP6F1DKrKo4lVDOUlW0BKjvlU6tesVbvY/06r3/D3kv++6RXLN9I2qT1HTVxAnUn8+bRyulFVXvhG+gRyeSL9ASlkeVkW...DVTycGfD2vyggmyZbmiEMNB2Q4DcqpNGKEGTLC2Dy3f7R4oIjQfAuxyrdSDuxUUyItpfq3Dpam3jJweXpeAvxzv1Pf7C8Ha6js+d5oW/mf+Jd5gkPd+u+xs79WxM= abhi@abhi18
Copy your own key into the window and then click Add Key and this will now let you access your github via key. To test whether this worked, from the shell, you can now try the following:
$ ssh -T git@github.com
Hi abhvious! You've successfully authenticated, but GitHub does not provide shell access.
$
GPG
There are many tools that support the PGP standard. In the remainder of this document I will provide a brief tutorial for using GNU Privacy Guard (GnuPG, or simply GPG), which is a free, open-source, command line implementation of PGP. You are welcome to use other tools if you wish, so long as they offer the necessary features to complete all the requirements of the project.
To install GPG under a Debian-based Linux distro, simply run:
$ sudo apt install gnupg
On recent Linux distributions, such as Ubuntu 19.10, this will install GPG version 2, which is what this assignment will assume you are using. On older Linux distributions, such as Ubuntu 16.04, version 2 of GPG can be installed via the “gnupg2” package instead (note that this method also changes the command to invoke GPG from “gpg” to “gpg2”). Other installation options for Linux, Windows, and macOS are available on the GnuPG homepage
There are a number of useful command line arguments for GPG that you will need to complete this assignment. If you ever get stuck, you can always type
$ gpg -help
to see a list of common command line arguments, or
$ man gpg
to open up the manual page for GPG. Alternatively, you can Google “man gpg” to find an online version of the manual page.
$ gpg --full-gen-key
is the command to generate a new keypair. The --full modifier lets you choose your encryption algorithm and key length; if you use the abbreviated –gen-key command you will not be given these options and the default algorithm/key length will be used. Note: you are welcome to choose an expiration date for your keypair if you want to, but make sure your keypair will not expire until the end of the semester at least!
$ gpg --edit-key <UID>
where
$ gpg --list-keys
$ gpg --list-sigs
$ gpg --check-sigs
all show the keys in your keyring. The first shows the keys, the second also shows their signatures (if they have any), and the last attempts to verify the signatures. Of course, you can only verify a signature from user X if you have imported a copy of X’s public key.
$ gpg --import <file>
is the command to import key material from the given file. This will be very useful, since you’ll need to import the course public key, as well as public keys from your classmates (so you can sign them).
$ gpg --armor --export <UID>
is the command to export the public key with the given UID from your keyring. You’ll need to export your public key so that you can give it to your classmates and receive their signatures. You’ll also need to export your classmates’ public keys after you sign them. Strangely, GPG prefers to output things in binary format, which is not particularly useful, so you almost always want to add the ASCII “armor” command line option.
$ gpg --armor --export-secret-keys
is the command to export all of your private keys. YOU SHOULD NEVER SHARE YOUR PRIVATE KEYS WITH ANYONE. THAT IS WHY THEY ARE CALLED PRIVATE KEYS. However, backing up your private keys is a good idea, possibly to a removable USB drive that you keep in a locked safe, or to a Yubikey.
$ gpg --armor --sign <file>
is the command to sign the given file using your private key. By default, GPG creates a new file with a “.asc” extension containing the ASCII armored, signed message.
$ gpg --armor --recipient <UID> --encrypt <file>
is the command to encrypt the given file for the given recipient. Obviously, you can’t encrypt something for someone if you don’t have their public key. Just as with signing, GPG produces a new file with a “.asc” extension containing the ASCII armored, encrypted file. Note that in this assignment you will need to sign and encrypt a file for me, which means you may need to combine command line arguments to produce the correct output.
$ gpg --decrypt <file>
is the command to decrypt the given file (and verify its signature, if one is present). Obviously, you can only decrypt a file if you hold the corresponding private key.
$ gpg --default-key <UID>
By default, GPG always uses the first private key in the keyring for signing, encryption, and decryption. If you have multiple private keys, this is the optional command line argument you need to select one other than the default when performing operations.
What you need to do
-
After creating a key, you need to export your public key in ASCII Armor format into the file key.pub. Your public key must meet the following four requirements:
- Use RSA encryption and be 4096 bits long
- Include your name and Northeastern email address
- Be signed by at least two of your classmates. Learn how to export your key so that others can sign it.
- Include your picture.
-
You need to produce a file named message.txt.asc that is encrypted to the class public key and signed by your private key. The unencrypted message.txt file should be in plain ASCII format that contains (1) your first and last name, (2) your github user name, and (3) the string “CY2550”.
For example, a valid message.txt might look like this:
abhi shelat abhvious CY2550
Note, your file needs to be “signed and encrypted” in the terminology of gpg. Be careful how you do this step; you will need to carefully read the gpg documentation to figure out how to do this. Use man gpg and gpg --help as well as internet resources to figure out how to do this. Part of this assignment’s goal is to encourage you to learn how to use these programs given only the documentation. In class, we discussed the possible failures in first signing and then encrypting; gpg takes some precautions when doing these steps together.
Backing Up Your Private Key
In the past, over 1/3 of students in the course lost access to their private key throughout the semester. This happened for a variety of reasons, including people choosing short expiration times for their keys, or because they used GPG inside a VM and the VM failed/became unbootable. You will need the keypair you generate during this project multiple times over the course of the semester. Thus, it is critical that you not lose your keys! You should make a backup of your private key, using the gpg --armor --export-secret-keys command, and store the backup in a secure, reliable location. Do not store your backup inside a VM!.
Tips
- A big part of this assignment is social, i.e. signing each others’ public keys. Take the pain out of key signing by throwing a Key Signing Party (Google it)!
- The assignment clearly states that message.txt needs to be encrypted and signed. That does not mean signed then encrypted, or encrypted first, and then signed. The difference here is subtle but substantial, and you will lose points if you turn in the wrong thing. GPG has a specific method for accomplishing this task, so look into
man gpgto find that method (hint, it just requires two command line flags when you callgpg).
Using Keybase to manage your keys and your identities
The first part of this project introduced you to the classical way of setting up your public key using a “web of trust” to help bind your identity to your key by having your friends sign your key. Can such a scheme scale to handle 1b users on the internet?
The keybase platform is a modern take on how to establish internet-scale identity. Keybase is an application platform that augments pgp with the ability to bind your key to public identities such as (a) your twitter account, (b) your github account, (c) a reddit account, etc. The platform makes it simple to download someone else’s key, verify that it is them by checking their twitter/github/etc account, and then send them encrypted or signed messages. Recently, it uses this infrastructure to build applications such as secure group chat, secure git hosting, and secure file sharing.
You can see my profile at keybase.io/abhi and import my pgp key using
$ curl https://keybase.io/abhi/pgp_keys.asc | gpg --import
You can also upload your newly created pgp key to Keybase for others to find. First, create a keybase account by visiting keybase.io and clicking the “Login” link, and creating a new account. Then install the keybase client on your machine. Finally, you can upload your key using the keybase tool. Read the instructions and figure out how to do that.
Next, follow at least two other people in the class on keybase and verify that their PGP keys correspond to their identity. You can, for example, follow me abhvious with PGP key 9CB4 0F15 612B 3E15.
Submitting Your Project
- Create a new directory named
project3. - Add the files
key.pub,message.txt.asc, anddecoded.txtto theproject3directory. - Submit in gradescope.
- You can update your files as many times as you like before the deadline. Just makes your changes locally, and then add them to another commit.
Grading
This project is worth 10% of your final grade, broken down as follows (out of 100):
- 10 points - turning in a 4096 bit, RSA public key
- 10 points - having a picture in your public key
- 10 points - having two valid signatures on your public key
- 20 points - turning in a correctly encrypted, signed, and formatted message.txt
- 10 points - having your same gpg key in keybase and follow 2 others in the class
- 10 points - adding an ssh key to your github
- 30 points - turning all 3 correctly decrypted ciphertexts
Points can be lost for turning in files in incorrect formats (e.g. not ASCII), failing to follow specified formatting or naming conventions, having signatures that do not verify, encrypting messages using the wrong keys, etc.